• About
  • Contact
  • Follow
  • Home
  • Cameras
  • Lenses
  • Accessories
  • Galleries
  • Basics
  • Sony Alpha
  • Sony Nex
  • Minolta AF
  • Minolta MF
  • A-Mount
  • E-Mount
  • Rokkor
  • Other
  • Flash
  • Software
  • Gear
  • Misc
Alphatracks is dedicated to Sony’s high-end cameras and lenses, as well as the wonderful SLRs made by Minolta.

If you are a Sony/Minolta shooter...or if you just love photography in general, you are bound to find something useful here. Enjoy!

Use Depth of Field to Improve Your Digital Photos

If you're new here, you may want to subscribe to my RSS feed. Thanks for visiting!

Shallow Depth of field

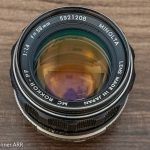
DOF with lens wide open at f/1.7.

Shallow Depth of field

Notice that when the lens is stopped down to f/3.2, the overall sharpness of the front car improves, although the other cars are still fuzzy.

Shallow Depth of field

Stopping the lens down to f/22, presents all three cars in sharp focus, as well as most of the background and foreground.

Depth of field describes the area in a photograph that is in sharp focus. I actually prefer the term “field of focus,” because I think it describes the concept much better. Photographers settled on depth of field long ago, however, so depth of field is the phrase everyone uses.

Depth of field (DOF) is a relatively simple concept to understand. Although only a single point in an image can be in true focus, various lenses and certain lens setting can create the appearance of a much wider area of focus. You can change the DOF in an image by changing the lens aperture, as well as moving closer or farther way from the subject.

A more academic approach to DOF would include discussion of things like circle of confusion and hyperfocal distance. For all practical purposes, however, you don’t require knowledge of these advanced topics to utilize DOF effects into your photos.

Use the proper Depth of Field for your subject matter

There is no “good” or “bad” depth of field. Depending on your subject and your artistic vision, you may choose to use a wide DOF for some images and a very narrow DOF for others. If you are shooting a portrait, you may want a narrow DOF, so only the person’s face is in sharp focus. If you are shooting a front three-quarter shot of a car, you may require a wide DOF, so everything from the grille to the rear bumper appears tack sharp.

There are three ways you can control depth of field:

  1. You can move farther away or closer to your subject
  2. You can switch the lens focal length
  3. You can change the aperture of the lens to a larger or smaller opening

Let’s look into these methods more closely.

Vary depth of field by altering the distance to your subject

Depth of field varies as you move closer or farther away from your subject. If you have ever shot closeups with a macro lens, you undoubtedly noticed that only your subject was in focus, while everything else was dramatically fuzzy. Because the lens was extremely close to the subject, the image exhibits very shallow DOF.

The same effect, although less noticeable, occurs when shooting any subject. The closer a lens of a particular focal length is to the subject, the less apparent depth of field you will see in the resulting photograph. Don’t expect to see a great difference in DOF unless you move the lens significantly. When you photograph something from afar, such as Big Ben or the Grand Canyon, chances are the entire subject will be in focus, because the subject was far away from the lens.

Change depth of field by changing the focal length

The second way to manage DOF is by changing lens focal length. Wideangle lenses tend to exaggerate the apparent depth of field, while telephoto lenses usually offer a shallow field of focus. The result is that almost everything will tend to appear in focus with a wideangle lens. A telephoto will allow you to isolate your subject from the background and foreground.

As I indicated earlier, which lens you choose will depend on what you are attempting to show in the photo. Suppose you are shooting a group of people seated around a table. Your goal will be to have everyone in focus, so a wideangle focal length will be the most appropriate choice. On the other hand, maybe you are shooting a craftsman working on a project in his crowded shop. By choosing a telephoto focal length you can cause only the man to be in focus, allowing the rest of the image to fade into a soft blur.

Notice I used the term wideangle and telephoto focal length instead of lens. Many zoom lenses include both wideangle and telephoto settings. This means depth of field produced by a zoom lens will vary with the selected focal length.

Control depth of field with aperture

The final way to control DOF is with lens aperture. Larger lens openings (smaller f-numbers) create shallower depth of field. Smaller lens openings create greater DOF. Think about what happens when you are trying to make out a sign that is too far away to read. Most people squint, causing their eye opening to be smaller and the sign to be more focused.

Your camera lens works exactly the same way. When you open the aperture to allow more light to pass through the lens, DOF becomes shallower. Stop the lens down to a smaller f/stop and DOF becomes more pronounced.

Now that you understand the concept behind depth of field, consider how you can use this knowledge to improve your photographs. I’ve already discussed how you can select an appropriate focal length for a particular subject. But the available DOF options are much more complex. Great photographers learn how to manipulate DOF to create arresting photos.

Isolating a subject from the background, whether it is a flea or a battleship, always produces interesting subjects. Most photographers choose to shoot architectural subjects with a widelangle, because the focal length allows them to capture the whole building while standing near it. To capitalize on shallow DOF, however, you could walk several blocks away and shoot with a telephoto, separating the building from other structures nearby.

Should the subject require many different elements to be in focus, you now know that you can achieve that result by either moving farther away, switching to a wideangle lens or selecting a smaller aperture. Naturally you can combine all these techniques to increase the DOF even further.

Other articles in the Basic Digital Photography series:

  • Understanding Depth of Field
  • Understanding the auto diaphragm of your dSLR
  • Camera ISO: the foundation of every great image

7 Trackbacks

  1. By Introducing Alphatracks Basics -- for new digital photographers | Alphatracks on January 2, 2009 at 1:38 am

    [...] Jan 1, 2009: Observant Alphatracks readers might have noticed a new Photography Basics section listed on the sidebar. The Basics area is still in development; in fact there is currently only a single article: a treatise on Depth of Field. [...]

  2. By Use Depth of Field to Improve Your Digital Photos - Computer Tricks and Tips on January 6, 2009 at 10:40 am

    [...] To understand more about depth of field, visit the basic photography area at Alphatracks.com to see photos and illustrations showing how DOF changes under different conditions. [...]

  3. By Törnebohms Hotspot » Blog Archive » FÃ¥ kontroll pÃ¥ skärpedjupet on January 10, 2009 at 9:43 am

    [...] [...]

  4. By Törnebohms Hotspot » Blog Archive » FÃ¥ kontroll pÃ¥ skärpedjupet on January 10, 2009 at 9:43 am

    [...] [...]

  5. By For Beginners and those that just forget things | RandomFusion on May 3, 2009 at 10:04 am

    [...] Read: alphatracks.com [...]

  6. By Use Depth of Field to Improve Your Digital Photos | Canon Wide Angle Lens on July 1, 2009 at 6:15 am

    [...] To understand more about depth of field, visit the basic photography area at Alphatracks.com to see photos and illustrations showing how DOF changes under different conditions. [...]

  7. By Twitter Trackbacks for Use Depth of Field to Improve Your Digital Photos | Alphatracks [alphatracks.com] on Topsy.com on September 5, 2009 at 8:38 pm

    [...] Use Depth of Field to Improve Your Digital Photos | Alphatracks alphatracks.com/dslr-photography-basics/use-depth-of-field-to-improve-your-digital-photos – view page – cached Depth of field is a simple photographic concept that can significantly improve your photos. — From the page [...]

Post a Comment Cancel reply

Your email is never published nor shared. Required fields are marked *

*
*

You may use these HTML tags and attributes: <a href="" title=""> <abbr title=""> <acronym title=""> <b> <blockquote cite=""> <cite> <code> <del datetime=""> <em> <i> <q cite=""> <strike> <strong>

Subscribe Now!

  • Subscribe to Alphatracks by Email
  • Subscribe by RSS

Privacy policy

  • Pages

    • About Me: Tom Bonner
    • Contact
    • DSLR Photography Basics
      • Better flash photos? Move your flash off the hot shoe
      • Camera ISO: the foundation of every great image
      • Use Depth of Field to Improve Your Digital Photos
      • What is an EVIL Camera?
      • Your dSLR's Automatic Diaphragm: Understanding how it works
    • Interview with Matt Shaw of Speak Up Magazine
    • Privacy and Disclosure
    • Review: Sony Alpha HLV-F42AM Electronic Flash
    • Sony Alpha flagship: posts, rumors and speculation
    • Sony and Minolta Lenses
    • Subscribe at no charge
    • The Alphatracks Visits series
  • Categories

    • A-Mount
    • A200
    • A230
    • A300
    • A330
    • A350
    • A380
    • A850
    • A900
    • Adobe
    • Aftermarket Lenses
    • Alphatracks Visits
    • Auto Focus SLR
    • Camera Mod
    • Digital Workflow
    • DSLR
    • E-Mount
    • Film Camera
    • Flash unit
    • Gallery
    • Hardware
    • Lenses
    • Manual Focus SLR
    • Marketing
    • Maxxum 5D
    • Memory Card
    • Minolta
    • NEX-7
    • Nex3
    • Nex5
    • Photography
    • Rokkor Lenses
    • Rumors
    • Software
    • Sony A200
    • Sony A300
    • Sony A700
    • Sony A900
    • Sony Alpha
    • Sony DSLR
    • Tips & Tricks
    • Uncategorized
    • Vertical Grip
  • Archives

    • May 2012
    • February 2012
    • January 2012
    • August 2011
    • March 2011
    • February 2011
    • January 2011
    • December 2010
    • November 2010
    • August 2010
    • June 2010
    • May 2010
    • April 2010
    • March 2010
    • February 2010
    • January 2010
    • December 2009
    • October 2009
    • September 2009
    • August 2009
    • June 2009
    • May 2009
    • March 2009
    • February 2009
    • January 2009
    • December 2008
    • November 2008
    • October 2008
    • June 2008
    • April 2008
    • March 2008
    • February 2008
    • January 2008
    • December 2007
    • November 2007
    • October 2007
    • September 2007
    • August 2007
    • July 2007
    • June 2007
    • March 2007
    • November 2006
    • August 2006
    • July 2006
    • June 2006
  • RSS Links

    • All posts
    • All comments
  • Meta

    • Log in
© Copyright 2006-2011 Tom Bonner. All rights reserved. Powered by WordPress. Built on the Thematic Theme Framework.