
Last time around, I addressed the RAW versus JPEG controversy and listed three advantages to shooting JPEG. I will get into the advantages of the RAW format, but first I want to explain why I shoot RAW almost 100% of the time.
When I acquired my first digital Minolta, I started shooting RAW because all of the top photographers recommended it. The truth is, however, I didn’t really see much difference between RAW and JPEG. I understood that the RAW image was capturing more data and therefore I should be getting superior images. Yet the difference didn’t seem that great.
RAW applications are much more than image converters
What I didn’t understand was that my early workflow was effectively canceling out most of the RAW advantages.
At the time, Adobe had yet to release the Adobe Camera Raw plugin for Photoshop. So the only way I had to process my RAW images was with the Minolta software that came with the camera.
I’ve used Photoshop extensively ever since version 2.0. I spent some ten years retouching high-resolution images for major advertising agencies, so I know Photoshop inside and out. The idea of using Minolta’s less featured application seemed counter productive. I knew how to get the results I wanted in Photoshop. I wasn’t sure I could get the same results from the Minolta app, So I simply used the Minolta application to convert my RAW images into TIFFs and then brought the TIFFs into Photoshop for my post processing. Hey, it seemed like a good idea at the time.
Of course by converting the RAW images into TIFFs with the default camera settings, I was losing the major advantage of working with RAW data. TIFF images usually contain more data than a JPEG, so I might have gotten slightly improved images with this method. What I didn’t understand, however, is that you need to edit the RAW images before exporting them to get the maximum tonal range. Since I was determined to adjust my images in Photoshop and Photoshop didn’t have a RAW import function at the time, I was leaving a whole lot of pixel information behind when I converted to TIFF.
RAW images: the advantages start to show
The dawning of comprehension came when I was in the studio shooting a vibrantly colored board game for a presentation. I was shooting with tungsten lights, so I set the camera’s white balance to a custom setting to match., After shooting for a while, I broke out my off-camera flash. You guessed it, I forgot to reset the white balance.
When I imported the resulting images into my Mac, those flash images featured excellent contrast and tonal range. Unfortunately, because they were shot under the wrong WB setting, they featured a pronounced blue hue. Anyone remember Aqua Velva aftershave? These images looked like they were shot through a big bottle of the stuff.
While I suspect that I could have retouched the images to make them look more natural, I wasn’t looking forward to it. Photoshop has lots of tools for adjusting color balance, but I knew that it would be a challenge to neutralize the blue without adversely affecting the rainbow of colors on the board. Fixing one color would throw off another — leading to time consuming cutting of masks, making alpha channels and creating selections.
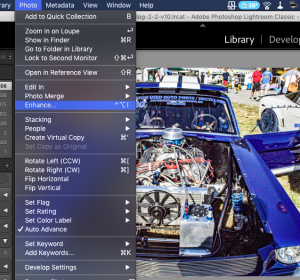
While I was mulling over my options, trying to determine if it would be better to spend hours retouching or if it would be best to re-shoot the whole thing, I noticed a white balance drop-down in the Minolta converter. With nothing to lose, I changed it to electronic flash and viola! In less then a second the blue hue vanished and all the game’s colors shown through in their wonderful, natural tones,
RAW image data to the rescue!
This worked, because I was still working with the RAW data. Had I exported the images to TIFF or JPEG (or shot the images directly in JPEG) the WB would have been locked down and the only way to correct it would be through painstaking retouching. Since RAW images have the ability to contain an infinite amount of WB settings, it was a simple matter to adjust to RAW image to the correct setting before export. Shooting RAW had saved me hours of work — whether in Photoshop or in the studio re-shooting.
A couple of weeks later, I was shooting a basketball game in an indoor arena. I was concerned about image noise, so I tried shooting at an ISO 0f 400. That didn’t allow me to shoot at fast enough shutter speed. Still wanting to avoid a higher ISO I switched to a flash unit. This gave me a fast shutter speed, but the flash wasn’t powerful enough to illuminate the scene unless the action was right in front of me. After about a dozen shots that appeared very underexposed on the LCD panel, I finally switched to ISO 1600 for the rest of the event
RAW doesn’t really care about ISO limits
When I imported these images, I was ready to throw the ISO 400 flash stuff away. The images were too underexposed to save, At least they would have been if they had been JPEGs. Sometimes you can rescue an underexposed JPEG in Photoshop, but these were just too far gone. By the time you got the exposure somewhat correct, the image would be a low-contrast muddy mess, with very little detail in the shadows. Since this is true of JPEGs, I thought it would be true of RAW as well.
Before tossing the nearly black images, however, I decided to experiment with adjusting the tonal range in the RAW converter. I opened the histogram palette and clicked on the “auto settings” button. I wasn’t expecting anything significant, yet a few seconds later I was looking at fully exposed image with plenty of detail in the shadows. I couldn’t believe it. The image was noisy, but it was fully usable. I ran some noise reduction software and had a salable image.
No way would a JPEG have been able to stand that amount of image editing and produce a useable image. The RAW image, however, saved all the data it captured, so even though I was metering at an ISO of 400, the RAW converter was able to “push” the ISO up to 1600 without losing detail. Yes the image was noisy, but under those lighting circumstances 1600 was the only viable option. Because I had shot in RAW, I was able to obtain that 1600 ISO even though the camera’s meter was set on ISO 400.
I’m convinced — I shoot RAW
Since then, I seldom — well never actually — take my camera off of RAW. In my last post, I did list some times I thought JPEG might offer some advantages. Thus far, however, I haven’t needed to resort to JPEG. It’s there if I should need it, but the more I shoot RAW, the more I prefer it over JEPG.
Next time I want to list all the RAW advantages. You didn’t think I was going to stop with just these two, did you?
Agree? Disagree? Tell me what you think!

Very informative RAW/JPEG article. The actual photo file situations described really works well. That is far better than text book stuff; what is RAW, what is JPEG etc. Please keep them coming.
Thanks Jim! I’m glad to know that these posts are helpful to folks. I appreciate you taking the time to let me know.
— Tom
Really nice article!
In addition I would suggest to pay attention on different RAW converters (not only ACR) like a Phase One and Dxo converters. They sometimes gives even more.
Again, great post. I can’t argue with you and your reasons are about the same for me and why I shoot RAW as well.
For your readers, here is my RAW shooting post again. Will provide some diagrams and example shots highlighting the great flexibility shooting RAW allows.
http://blogs.adamparkerphotography.com/blog/Make-your-pictures-happy-shoot-in-RAW/18/
Look forward to reading more of you blog. Thanks.