Generally, the Auto-White Balance function on the Sony Alpha dSLR family does an excellent job of matching the white balance of the sensor to the color temperature of the subject. Occasionally, however, you encounter situations that the auto WB setting just cannot handle.
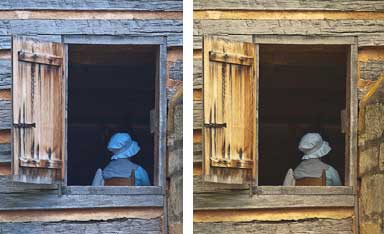
Complex White Balance dilemma: The wall of the house on the left appears correct, but the girl’s bonnet and clothing look cyan blue. Correcting the blue color (right) yields a raw yellow outer wall.
Last week, I was shooting at the Schiele Museum’s “Inspired by Nature” 18th century crafts program. One of the first things I saw was a woman in a mob cap, seated in the window of the museum’s log farmhouse. I thought it would make a great photo, so I shot several images.
I was pleased with the final results, except for one problem. Although the girl was well lit, the white balance inside the window was off. The outside of the farmhouse looked great, but the girl’s clothing had a distinct blue cast to it.
Because I shot the image in RAW, it was trivial to adjust the WB of the girl’s clothing. I process my RAW images in Adobe Lightroom, so all I had to do is use the white balance eye dropper in the develop module. I clicked on the girl’s mob cap and it instantly corrected the blue cast.
While Miss Mob Cap now looked natural, the exterior of the farm house took on a strange yellow hue. Fixing the white balance of the girl in the window ruined the WB of the rest of the image.
I tried manually tweaking the image with Lightroom’s white balance sliders, but the story was the same. I couldn’t balance both the girl and house and make the image look natural.
There are several ways I could have corrected the problem. I decided on an approach using the layers in Adobe Photoshop.
Localized correction to the rescue
The easiest solution was to just ignore the blue cast. The image would still look good, and the blue cast might even add some mystery to the final image.
A second approach would be to convert the image to black and white. In grayscale, there are no white balance issues. It might also add a historical feel to the image.
The third approach was to manipulate the image so both the girl and the house looked correct. This was the solution I ultimately decided on.
Why Photoshop layers?
Obviously, I needed a way to adjust the girl’s clothing without affecting the color balance of the house. Since Version 2, Lightroom offers tools to perform localized corrections. I could have attempted to fix the cast in Lightroom, but I feel that the local correction tools in Photoshop are easier to use and more accurate. I have nothing against Lightroom. Lightroom’s overall correction tools are first rate. When it comes to local edits, however, I always reach for Photoshop.
Step 1: Create a Virtual Copy
Lightroom allows you to make virtual copies of your RAW images. Because Lightroom keeps all the editing information in it’s database, virtual copies don’t require extra storage space.
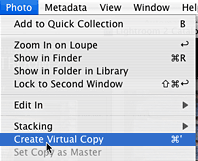
FG 149.1: Select the image in Lightroom, then from the Photo menu, select “Create Virtual Copy.” This creates a duplicate in Lightroom’s database that we can work with.
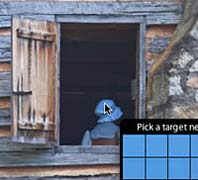
FG 149.2: With copy selected in the Develop module, use the white balance eyedropper and click on an area that should be neutral.
I began by doing some minor color correcting and exposure adjustments to the base RAW image. When I was happy with the overall look of the image, I used the command from the PHOTO menu to create a virtual copy.

FG 149.3: I opened both photos in Photoshop, then simply dragged the yellow version on top of the blue one.
With copy open in Lightroom’s Develop module, I selected the White Balance eye dropper and clicked on the woman’s hat. The exact location wasn’t critical, I was simply telling Lightroom that the area I clicked on should reproduce as a neutral white. When I clicked, LR changed the WB of the entire photo. I now had two images to work with; my original image and virtual copy with the improved indoor white balance. (See Fg 149.3)
I now selected both images and chose export from the File menu. I saved both images as high resolution JPEGs in a folder on my hard disk. Because I used the same settings for export, both images were exactly the same size and resolution.
Step 2: Align the images in Photoshop
I opened both images in Photoshop. For the purpose of this tutorial, I will refer to the photo with the aqua indoor cast as “blue.” I’ll call the image with the yellow farm house “yellow.”
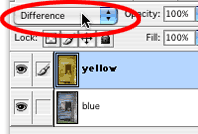
FG 149.4: After opening both images in Photoshop, I dragged the image with the yellow cast directly on top of the layer with the blue cast. To align the layers perfectly, I temporarily changed the top layer’s blending mode to Difference.
I placed the images side by side in Photoshop. I zoomed the the images so I could see both images at once. As long as images are set to the same mode (i.e. RGB) Photoshop allows you to copy between them by clicking and dragging. I simply clciked on the yellow file and dragged the yellow image to the blue file. Photoshop automatically created a new layer from the yellow image.
This resulted in a file with two layers, with the yellow layer on top of the blue one.
To make sure everything was aligned correctly, I temporarily changed the yellow layer Blending Mode to “Difference.” In this mode, any misalignment displays as colored highlights. When you nudge everything into alignment, the color disappears and the screen is an even, dark gray. To make sure everything looks perfect, I generally zoom in to about 400% for this step.
Step 3: Bring on the Pen Tool
After changing the blending mode back to normal, both layers were perfectly aligned, with the yellow layer on top. Now I needed to create a mask for the top layer.
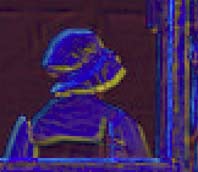
FG 149.5: With the top layer blending set to Difference, it is easy to see where the two layers are misaligned.
I selected the Pen tool from the tool palette. Some people are intimidated by the pen tool, but once you understand how it works, it is really easy to use. Using the pen tool is beyond the scope of this tutorial. If there is sufficient interest, I may create a separate Pen tool tutorial at a later date.
In this case, since I was dealing with the rectangular opening of the window, there were no angles or curves to deal with. So I could fly through my pen tool editing.
With the image still zoomed to 400%, I clicked in the top left corner of the window area. This established a starting point for my path. I then moved the cursor to the top right corner and clicked again. Photoshop immediately drew a path connecting the two points. A path is a line overlaid on the image in Photoshop. It is not part of the final image and can be turned on and off as you work.
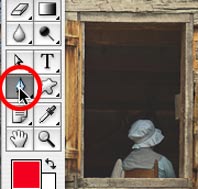
FG 149.6: The most accurate way to create a selection is with the Pen tool. The idea will be to outline the window area so the rest of the layer can be masked away. The Pen tool will allow me to precisely follow the window sill frame.
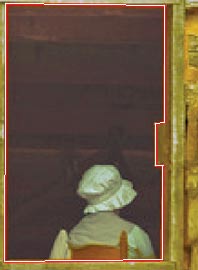
FG 149.7: The white line overlaying the red border indicates the path I created.
I then clicked about part way down, where part of the window sill protrudes into the cabin. Photoshop drew a second line, connected to the first path line I had established. Each time you click with an active path, Photoshop will extend the path to a new point.
After carefully tracing around the inner windowsill on the right side of the window, I continued to extend the path across the bottom and up the left side. I completed the path clicking on my original point in the top left corner of the window.
I now had a path that exactly outlined the inner window area, which happened to be the only area on the yellow layer that had the correct white balance.
Step 4: Create a layer mask
Now the magic. I opened the Path palette and made sure the path I had just drawn was active. Then I clicked on the “Load Path as a selection” tool at the bottom of the path palette. This created selection exactly matching the path.
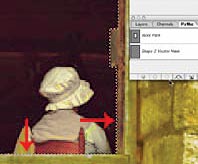
FG 149.8: The red arrows point to the “marching ants” selection indicator. This tells me that I have a selection around the window area.
Lets review. If you think through the steps, you know that I had two layers, exactly overlaying each other. I now had a selection area precisely outlining the window area on the yellow layer.
Making sure the yellow layer was selected in the Layer palette, I chose the Add Layer Mask command from the Layer menu. Photoshop gave me a choice of “Reveal Selection” or “Hide Slection.” Because the area inside the selection contained the proper white balance, I chose Reveal Selection.
Immediately, Photoshop created a mask that matched my selection. Everything outside of the selection on the yellow layer became invisible. It was still there, and if I removed or edited the mask, I could recover the hidden part of the layer. For all intents and purposes, however, only the window area inside the mask remained visible. The bottom blue layer shown through everywhere except the window area, which was covered by the correctly balanced window from the yellow layer.
Success!
Both the outside and inside areas in my image now looked natural. All I had to do to complete the editing was to flatten the image and save it as a TIFF or JPEG. The logs on the house appear in an accurate gray color, and the girl is wearing a white cap.
You can see the final result in the Schiele Backcountry Farm image gallery.

FG 149.9: The layer mask has been applied, placing the corrected widow area directly over the lower image. You can see the mask beside the yellow layer. The black area of the mask makes the corresponding area in the yellow layer invisible. The white area of the mask allows that part of the yellow layer to show through. The mask has no effect on the blue layer, so it renders normally, except where it is covered by the unmasked area of the yellow layer on top.
I took my time describing this process, in order to make it as clear as possible. That may imply that that creating a layer mask such as this is difficult or time consuming. That is not the case. It probably took me less than five minutes to export the two versions of the image and combine them in Photoshop.
What is truth?
Some people find the whole idea of photo manipulation to be controversial. A photo is supposed to represent truth. They feel any retouching beyond simple exposure correction is messing with the truth.
I understand how their point, but in reality, photo manipulation has existed as far back as civil war photographer Matthew Brady, and some of the best known film photographers routinely performed extensive darkroom corrections when making prints.
More importantly, my camera did not record an accurate rendition of the scene I saw when I took the photo. Because the human eye can process much more color information than a digital sensor, I didn’t see a blue cast inside the window. The girl’s clothing looked neutral.
So the camera actually lied when it tinted the mob cap aqua. And of course when I corrected the girls clothing in Lightroom, the outside of the house looked nothing like the actual scene. So manipulation proved to be the only way to make the photo adhere to the truth.
What type of manipulation you do and how much of it you apply to your own photos is something you will have to determine for yourself. As far as the mob cap in the window is concerned, I think my final image is the closest I could come to the truth.

Excellent post and process. I can use in my work. -dz
Hi uncovered your website as a result of Youtube and it’s impressive!! I’ll be coming back for confident.